I love makeup, skincare and
everything girly, so the hardest part of writing my first blog article is, what
topic do I choose? I finally hit on the one thing I’m known for – smoky eyes. I
have small eyes, which I hate, so I try every trick in the book to make them look
bigger and more dramatic. I wear smoky eyes every day, and do my makeup on the
train (it buys me an extra 30 minutes sleep!). Because I’m travelling and don’t
want to take a brush roll and 300 shadows with me every day, I had to choose my
“bare essentials” and trim my technique as well. It showed me how little I
need, and how little effort it is, to get the smoky look I love. So without
further ado, let me share my technique with you for easy-peasy smoky eyes!
Click through to read more:
Click through to read more:
What I used for this look:

Step 1: Creating a
base
I always start with
an eyelid primer – it gives a nice even “tacky” base for the shadow to stick
to, and lighter colours tend to “grab” more and appear more pigmented. If you
don’t have a specific lid primer, dab on some foundation or concealer.
Start with your lightest shade – a
“highlight shade” like white, champagne, or silver. If I am using warm-toned
green or brown shadows I will use champagne, gold or cream as my highlight
shade. For cooler colours like purples or greys I’ll use silver or white. Cover
the eyelid with your highlight shade, concentrating on the inner corner.

Step 2: Adding colour

Your second shade is your mid-toned shade. This is where you can add a
pop of colour e.g. a vibrant green, purple, or copper. Using a fluffy blending
brush or sponge applicator, start on the middle of your eyelid and work the
colour towards the outer corner. With the remnants of colour on the applicator,
lightly wash your second shadow over the inner corner to blend the two shades
together. Finally lightly blend the second shadow into the crease, taking it
above the crease by about 3-4mm.


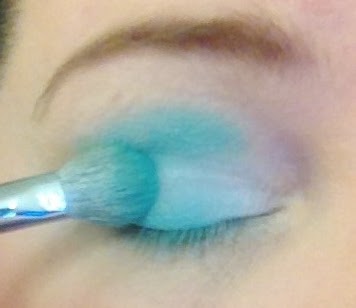

Step 3: Smokin’!
Now for the “smoke”! You don’t need much – this is where I used to go
wrong, applying deep shadow to my entire lid and looking like I’d been in a bar
brawl!
Take a small brush or
fine applicator, and apply the deepest shade to your upper lid in a sideways V with
the point facing the outer corner of your eye - a smudgy line along the outer
third of your upper lash line, and the outer third of the crease.


Deepen the outer third of the eyelid little by
little, and then switch back to your fluffy brush to add depth through the
crease, bringing the shadow to just above the crease line and blending it
through your mid-toned shade.

Switch back to the fine brush and line your lower
lash line if desired, and shape the outer edges to get the final look you want.

Finish with mascara and you’re done!

Finish with mascara and you’re done!
This technique is easy and versatile
– if you have a white, and a black, then you can put pretty much any colour in
the middle, no matter how vibrant or crazy, and it will blend together into a
gorgeous look, especially with a slick of black eyeliner. If you’re feeling creative you can add a bright
eyeliner, or glitter liner, along the top lash line, or some false lashes to
vamp up the look a little bit.
Thanks for reading my very first blog post, Tokidoki kitty and I hope this helps you get a bit more adventurous
with your eye shadow – life is too short to live without colour!


Congratulations on your new blog! This is a wonderful tutorial which is easy to follow and you look gorgeous. I love seeing Tokidoki making an appearance. Xx
ReplyDeleteThanks Kate! I have a feeling Tokidoki will be a regular guest, she can't stay away when I'm doing my makeup, she loves all my goat hair brushes!
DeleteI really enjoyed reading your first blog... A big congratulations, it looks fantastic!
ReplyDeleteYou make smoky eyes look easy, and the final result is just gorgeous... I don't know why you think your eyes are small, I think they are beautiful shape and colour.
Keep blogging xx
Claire
Thanks Claire, its so lovely to get kind feedback when I'm so nervous about starting out. Thanks for taking the time to comment and making me feel awesome :)
DeleteAww hon, this would have been PERFECT for the ABA's! Absolutely gorgeous and brilliantly easy to follow instructions - I'm going to try this technique for sure :-) And btw, Toki's eyes and yours are twins - prrrrrrrrrr...
ReplyDeleteHaha Kats you always say the sweetest things! This is a really easy technique, perfect for train commuters like us! Give it a year and you'll be asking the businessman next to you to hold your mirror while you put your mascara on, lol I'm shameless!
DeleteI absolutely loved your tightlining tips for your blogstar entry, and the pale liner on the waterline? Two simple tricks that work wonders, I was truly impressed! Looking forward to you starting a blog of your own :)
OMG, I've always struggled with a smoky eye! This tutorial is perfect and easy to follow. I will have to try it
ReplyDeletexx
Thanks for the nice feedback, I am sure you will have no trouble pulling off this look!
Delete